If you have ever had a scuffed or cracked bumper, you might have wondered what actually happens when a technician fixes it. The process is more involved than most people expect, and understanding it can help you feel confident about the work being done on your car.
This guide walks through each stage of a bumper repair in Kent, from the moment a technician takes a look at the damage right through to the finished result.
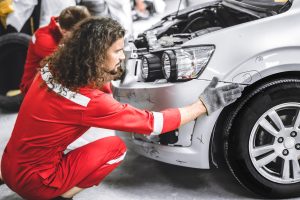
Stage 1: Assessment
Before any tools come out, the technician looks closely at the damage. This is not just a quick glance. They check:
- How deep the damage goes
- Whether the bumper is cracked, dented, or scuffed
- Whether any clips or fittings have broken underneath
- Whether the reinforcement bar behind the bumper has been affected
This step matters because different types of damage need different approaches. A surface scuff is handled differently from a crack that goes all the way through. If hidden structural damage is found, the customer is told before work begins.
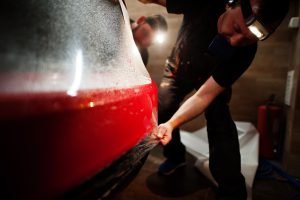
Stage 2: Cleaning the Damaged Area
Once the damage has been assessed, the area is cleaned thoroughly. Any dirt, grease, or wax is removed from the surface. This is essential because paint and filler will not stick properly to a contaminated surface. A clean base means a longer-lasting repair.
Stage 3: Reshaping or Filling
This is where the repair work begins in earnest, and the technique used depends on the type of damage.
| Type of Damage | Technique Used |
|---|---|
| Light scuff or surface scratch | Sanding and light filling |
| Dent or pushed-in section | Heat reshaping to push the plastic back |
| Crack through the bumper | Plastic welding, then filling |
| Deep gouge | Specialist filler applied in layers |
Most modern car bumpers are made from thermoplastic. This means heat can be used to reshape them rather than replacing the whole part. A technician will carefully apply heat to push the plastic back into position before any filling takes place.
For cracks, plastic welding is used to bond the edges back together from the inside. This gives the repair strength before the visible surface is worked on.
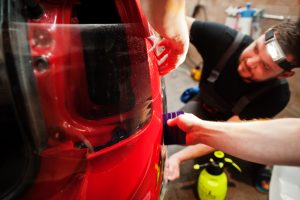
Stage 4: Sanding
Once the filler or reshaped area has cured, it is sanded down in stages. The technician starts with a coarser grit to remove the bulk of any unevenness, then moves to finer grits to create a smooth surface. The goal is to get the repair area as flat and even as the surrounding bumper before any paint goes on.
Sanding is done carefully to avoid damaging the paintwork around the repair. The edges of the repair are blended gradually so there is no obvious line between the old surface and the new one.
Stage 5: Priming
A primer coat is applied over the repaired area before any colour goes on. Primer serves two purposes. First, it seals the repair so moisture cannot get into the filler or bare plastic. Second, it gives the topcoat of paint something to bond to, which helps the colour last longer.
The primer is allowed to dry fully before the next stage. In a mobile setting, the technician will work in conditions that allow for proper drying, as rushing this step can affect the quality of the finish.
Stage 6: Colour Matching
This is one of the most important parts of the process. Getting the colour wrong means the repair is obvious, which defeats the purpose.
Each car has a paint code, usually found on a sticker inside the door frame or in the service documentation. The technician uses this code to mix paint that matches the original colour precisely. Modern mixing systems can account for how a colour has aged slightly on the car, so the repair does not look noticeably newer than the rest of the bodywork.
For a smart repair service, colour matching is done on-site using specialist equipment, so there is no need to take the car anywhere.
Stage 7: Painting
The matched paint is applied in thin, even coats. Multiple coats are usually needed to build up the right depth of colour and coverage. Each coat is allowed to flash off (partially dry) before the next one is applied.
After the colour coats, a lacquer or clear coat is applied on top. This is what gives modern car paint its shine and protects the colour layer underneath. The lacquer is blended carefully into the surrounding area so the repair merges with the original paintwork.
Stage 8: Finishing and Quality Check
Once the paint has cured, the repaired area is buffed and polished to bring up the gloss. Any slight imperfections in the surface are addressed at this point.
The technician then carries out a final check, looking at the repair from different angles and in different light to make sure the colour and finish match the rest of the car. The customer is shown the result before the job is signed off.
The whole process, from assessment to final polish, typically takes a few hours when carried out by a mobile technician who comes to your location.
Why the Process Matters
Each stage builds on the last. Skipping or rushing any part of the plastic bumper repair stages leads to a result that looks poor or does not last. A repair done properly should be difficult to spot, even up close.
It is worth noting that a well-maintained bumper also plays a practical role. According to the GOV.UK Highway Code, Annex 6, keeping your vehicle in good condition is part of your responsibility as a driver. A damaged bumper can affect the way sensors and cameras behind it work on newer vehicles, so there is more to a repair than just looks.
Book a Mobile Bumper Repair in Kent
Smart Fix Autos carries out mobile bumper repairs across the county, coming to your home, workplace, or any convenient location. There is no need to arrange a courtesy car or take time off to drop your vehicle at a body shop.
The team is mobile across Kent, covering Gravesend, Maidstone, Sevenoaks, Tonbridge, Tunbridge Wells, and surrounding areas. Get in touch to arrange a free quote.